Showing posts with label indian cooking. Show all posts

Sunday, October 28, 2012

Microwave Besan laddoo


Hello friends! Today is janmashtmi, birth of Lord Krishna. I thought why not share one of my favourite recipes now on this occasion. I have always loved Besan Laddoo and one of my friend knew my craving or weakness for this and she would make full tin and give it to me.

I had made this recipe on stove top also and it came out good except I could not give it laddoo shape. Recently I bought a microwave convection oven and  kept experimenting and trying out things. I have made few dishes with it already which I would share with you all soon but today I want to share with you this yummy sweet dish. Its really pretty easy one.


http://chattersmusings.blogspot.com/


Temperature and settings would vary from oven to oven.

Ingredients:

1 cup besan
3/4 cup castor sugar
6-7 tbsp ghee
1/4tsp cardomom powder


Method:
Heat ghee in a microwave safe bowl at 100% power for 1 min.
Carefully remove the bowl and add besan  and mix it well. Microwave at 100% power for 4min, stirring it after every 1min.
Then again microwave at 50% power  for 3mins stirring continuously after every 1 min.
Remove from oven and add castor sugar and  cardomom powder and mix it thoroughly.
Let it cool and then divide into small portions and shape them in  form of laddoos. Store it in airtight container.

Laddoos are ready and  I am sure no one would stop and it would finish in no time.
This recipe was written with the book I got with oven.  Hope you enjoy this yummy sweet.

Notes: I did not have castor sugar with me so I just used my mixie to grind sugar and for extra flavour I added few cashewnuts along with green cardamom.

You can have them as it is or decorate with pistachio or  cashewnuts.
I have made this few times already. so tip is initially use less ghee and later if the laddos are not forming add a little melted ghee to hold them. If there is too much ghee it wont form shape.

For stove top method: Make it same way. Roast besan with little ghee till aromatic smell comes out and make sure not to over cook the besan. Remove from gas and add sugar and cardomom powder. Let it cool and then form laddos.

So what do you think of my attempts with this. Waiting to hear from you all and HAPPY JANMASHTMI  to everyone..


http://chattersmusings.blogspot.com/


http://chattersmusings.blogspot.com/


My blogger friend Divya had organised a massive master chef contest on her blog and very recently she announced the winners. Divya gave participation certificates plus nomination certificates to everyone. Thank you Divya for this wonderful opportunity.


My recipe was grilled paneer bhurji sandwich  and you can read about it HERE

This is a repost.
Linking this to 60 days to christmas
Event hosted by Divya from You too can cook and Priya from Cook like Priya


Friday, August 24, 2012

Bhindi masala.. Microwave version


Hello  all! I had told  in my  besan ladoo post that I had bought a microwave convection oven some time back and had experimented with it.  My eyes caught this Bhindi  masala dish and I gave it a  try. I am lousy when it comes to cooking bhindi on stove top and it never comes out good. But in oven it was the best and hubby insists I make bhindi in oven only.  Trust me you would love it.


http://chattersmusings.blogspot.com/

Ingredients:
½ kg Bhindi/okra
½ tsp red chilli powder
1/2tsp haldi powder
2green chillies chopped
1 tsp coriander powder
½ tsp  amchoor/dry mango powder
Salt to taste
¼ tsp jeera/cumin seeds
3 tbsp oil


Method:
Wash an wipe bhindi dry.  Cut the tip head and tail of each bhindi. Chop  bhindi into medium size or as desired.
In a microwave safe glass bowl, put 1tbsp oil, add jeera and  chopped green chillies.  Microwave at 100% power  for  2 mins.  Remove and add bhindi and other dry masalas. Mix well and add the remaining 2tbsp oil.  Set the combination mode of microwave and grill  for 10 mins or till bhindi is cooked.  I kept it at 70% power  for  8mins.  I stopped the timer in between to check on bhindis and they were done.
Remove and  serve it hot with rotis.
(temperature and oven settings would vary from oven to oven)
Notes:
You can add potato too here but time has to increase for potato  to be cooked too.
Adjust  masala as per your taste.
Trial and error with timings  works best.

Hope  you all liked it and over to you for your feed back.


http://chattersmusings.blogspot.com/


http://chattersmusings.blogspot.com/

Monday, August 20, 2012

Nei Urundai / Ghee Moong Dal Balls...Guest post


Hello everyone!Today I am pleased to welcome a dear friend and fellow blogger Divya Pramil. She has wonderful blog with both veg and non veg dishes at http://youtoocancookindianfood.blogspot.in/. And she is sharing one interesting South Indian sweet dish with us here. Read on in her own words...


***************************************************


I am a home maker and married for a year and half to my love. I love cooking and started to love it right from my childhood days. My hubby loves all my recipes; I try my best to satisfy his taste buds by cooking varieties and traditional food too.  Here in my blog I try to update only the best recipes that my hubby considers fit for sharing. I have keen interest on art work especially aari work and painting. And I love watching Disney cartoons and Movies especially Cinderella. Blogging has helped me go further into the world of cooking, find new friends and well wishers like Meenu (Meena ji). Thanks Meenu for giving me this nice opportunity.  I think that was too much about me so let’s move on to the recipe.


Nei Urundai is a very traditional recipe from Tamil Nadu. It is so aromatic, delicious and perfectly suits any celebrations. I love it and do make it quite often when I feel like having a rich sweet recipe that can be made in just minutes. It is so simple to make, does not need too much of effort and can be made in a jiffy. You can make this sweet recipe using moong dal or urad dal or with chana dal also. But my favorite is the moong dal version. The ghee’ aroma and moong dal’s flavor blends very well and you will realize it in every bite, it will just melt in your mouth.  Just try it and you will fall in love with it.  Now let’s see what is needed and how to prepare it. 


INGREDIENTS

1.       Moong dal / Green gram dal / Paasi paruppu – ½ cup
2.      Sugar – ½ cup or lesser
3.      Ghee – 5 spoons
4.      Cashews – 5 (Optional) 


PREPARATION METHOD

Heat a pan/wok and dry roast moong dal until it turns slightly reddish/brown. Do not burn it. It must have a pleasant aroma. 

Remove from flame and in the same pan dry roast cashews until it turns slightly brown. 

Remove from flame and set them aside until they reach room temperature. 

In a blender add the roasted cashews, moong dal and sugar and make a fine powder out of it.

Heat a tadka pan or pan/wok and add ghee to it and let it melt. Add this to the powdered mixture and mix well.

Make small balls or any desired shapes out of it and serve. 


TIP 1: Make it a very fine powder to get the best consistency. My hubby loves it crunchy so I make it a little coarse. It will taste good too.

TIP 2: I have added cashews which will enhance the flavor and aroma. You can omit them, they are optional. Even without cashews the recipe will taste super delicious.

TIP 3: Roast the moong dal evenly and well by stirring frequently, so that all the grains are cooked evenly. Never burn them; it will spoil the taste of the balls. 

TIP 4: You can use the chana dal (kadalai paruppu) and urad dal (Ulutham paruppu) for making these balls. 

Tip 5: You can make powder using these dals and store it for future use. So you can make these balls quickly on any occasion. See that there is no water in the blender or the containers in which you store them. Use dry and clean airtight containers.

Yummy and aromatic Nei urundai is now ready!! Serve it as a snack!!


******************************************


Thank you Divya for a yummy dish. Hope you all like it and over to you all for feed back.

Wednesday, August 15, 2012

Paneer Pasanda


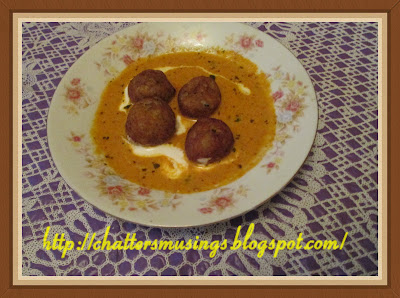
Hello all! Happy Independence Day to everyone. Today on occasion of 65th Independence day I thought let me share with you a recipe which till I made was new to me but I am sure my friends here know about it very well. Paneer pasanda I had heard the name only but never knew what the difference was and why such name. After making it I realized its because we love paneer  so the name comes. I saw this recipe on tv and I felt I could make it. I made few changes in the gravy but still it turned awesome. Paneer pasanda is made using paneer cutlets in gravy. Again patience as it takes some time to make it. Hope you all like the recipe.


                                                                PANEER PASANDA

http://chattersmusings.blogspot.com/


Ingredients for paneer cutlet:

  • 1 cup crumbled paneer
  • 2 tbsp Maida
  • 1/2tsp Pepper
  • Salt to taste
  • 3 bread slices
  • Oil as needed for shallow frying.
(if you need you can stuff paneer also which I didn’t do this time)

Ingredients for gravy:

  • 1 ½ cup onion sliced
  • 1tsp ginger garlic paste
  • ½  cup curd
  • ½ tsp garam masala powder
  • ½ tsp  red chilli powder
  • Salt to taste
  • 2 tbsp oil
  • 2-3 green chillies (if you want more spicy gravy)
  • Coriander leaves to garnish.
  • (additional  some cashewnut  pieces)


Method:

In a bowl mix crumbled paneer, salt, pepper, bread slices and maida. Give desired shape to paneer cutlets.  Heat  a pan with some oil and shallow fry all the cutlets till cooked on both sides. Keep it aside.


http://chattersmusings.blogspot.com/
                                                             Paneer cutlets

Take another pan. Add 1 tbsp oil from gravy ingredients and  fry onions, ginger garlic paste, green chilli and cashews if you are adding.  After onions change color, remove from heat and let it cool. Then grind the whole thing with little water to make a paste.
Heat the pan again and add the remaining 1 tbsp oil. Fry the ground paste of onions for 3-4minutes. Add garam masala powder and chilli powder and fry for a minute.  Beat the curd well and add it in this mix. Cook the whole thing till oil starts to separate.  Add ½ cup water and bring the gravy to boil. And don’t forget to add namak shamak, salt at this point.
Put the cutlets in bowl and pour gravy over it.  Garnish with coriander leaves and serve hot.


http://chattersmusings.blogspot.com/


Notes: cutlets can be deep fried and stuffed. Gravy should be the right consistency.  Beat the curd well to prevent it from curdling. My gravy does look curdled though but it has given it a different look than what I saw on tv.

Hope you enjoy paneer pasanda. Let me know what you think.


Monday, July 30, 2012

Dudhi kofta/ghiya kofta with gravy


Hello all my friends! My today's recipe is bit lengthy and it requires some patience which sadly I seem to lack but well I had to make this correctly. Please excuse the quality of the pics as somehow I could not keep my hand steady. Today's menu is dudhi kofta. Hmmm, looks like your mouth started watering eh!  Lets start our koftas and gravy.


http://chattersmusings.blogspot.com/

Ingredients:
2 cups  Ghiya or Lauki (bottlegourd), peeled and grated.
1 large Onion (chopped)
1 large Tomato (chopped)
8-10 cashewnuts
3-4 large spoons of gram flour (besan)
2 tbsp Yoghurt/curd
1 tsp Ginger garlic paste
1/2 tsp Black pepper powder
3-4 chopped Green chilies
1 tsp whole Cumin seeds
1 tsp Coriander-Cumin powder
1/4 tsp Turmeric powder
1 tsp Red Chili powder
Salt (according to taste) 
Oil to deep fry 
Chopped Coriander leaves for garnishing


Method:

Squeeze water out of the ghiya; mix in salt, ginger and black pepper. Add  besan, 1/2 tsp red chilli powder and coriander-cumin powder, mix well and give desired shape. I gave them bit oblong shape.
Deep-fry koftas to a golden brown and keep aside. 
http://chattersmusings.blogspot.com/
                                                                     Koftas

Put green chillies, onion, yoghurt,cashewnuts and tomatoes all together in a blender and make puree out of it.

Add 2 large spoons of oil in a kadhai/pan.
Add  ginger-garlic paste and stir for few mins then add  the puree to it. Continuously stir the masala for few mins..
Add the dry masala, i.e. red chili powder, coriander-cumin powder, turmeric powder and salt to taste.
Add 2 cups of water to make the gravy. Boil the gravy till its ready.
Add koftas into the gravy or pour hot gravy on the koftas.
Garnish with fresh coriander leaves.
Serve hot with chapati or rice.

http://chattersmusings.blogspot.com/


Note: If you plan to serve later then add koftas in plate and pour gravy while serving. If kofta stick in your hands add more besan.

Hope you all like it. Over to you for feedback, friends…

I also got award from  Punitha at South India food recipes .
Thank you Punitha

I would like to share this award with  all my lovely blogger friends. 


Monday, July 23, 2012

Chana masala/chick peas with gravy...


Hello friends! My today's recipe is again a simple one without use of onion, garlic or tomato. Our daily food normally doesn't consist of onion or garlic. Feel free to add them if you so desire. Lets cook chana masala now.


http://chattersmusings.blogspot.com/


Ingredients:

Chick peas (soaked overnight) – 2 cups
Potatoes (medium sized) – 2 .
Gram flour – 1 tbsp
Chilli powder – 1/2 tspn.
Turmeric powder – 1/4 tspn.
Coriander and cumin powder – 1/2 tspn.
Tamarind – 1 small piece.
Asafoetida – pinch
Green chillies - 3 – 4 .
Ginger – 1/2″ piece 
Oil – 2 tbsp.
Coriander leaves  (finely chopped) – 1/4 bunch
Salt - to taste

Method:

Soak the chick peas in water overnight in sufficient water as the chick peas grow in size after soaking them.

Make a small bag of loose tea powder or tea bag. 

Pressure cook the chick peas and the chopped potatoes with the bag of tea powder and some salt.  Cook to 2-3 whistles or till the  chick peas become tender. Keep the cooked chick peas  aside and retain the water in which it is cooked. Remove tea bag from chana.

Take a pan, add oil to it and place it on a slow flame. Then add asafoetida, keep on stirring it  while adding gram flour. Stir it till it changes color to become light brown. Then add chillies, ginger, red chilli powder, turmeric powder, coriander and jeera powder.

Squash the tamarind soaked in water with your fingers so that the pulp gets dissolved in water. Strain this mixture and pour it in the above pan.

Now add the cooked chana with the retained water to the pan. Add little salt and mix it well. If required add a cup of water to it. Adjust the seasonings if required.

Let this mixture simmer for 15-20 minutes till the gravy becomes thick.

Garnish with fresh chopped coriander leaves and ginger strips and serve hot.

Chana  can be served with Poori, chapatti or rice.

Over to you for your views.


http://chattersmusings.blogspot.com/

Monday, July 09, 2012

Mix vegetables with chana dal


Hello!  Today I would share with you one of our recipes which I myself like it and its again very easy to make.   I really need to say this because of all my blogging friends and who are all great cooks I was also inspired to write about my recipes or rather what  I cook at home and as I was told, cooking is bit of this and bit of that.  So here we go….

Today recipe is mix vegetables with chana dal and once again you are free to make variations as you find it fit. Please adjust all seasonings according to your taste. Let’s start our recipe…

Ingredients:

¼ cup chana dal (Bengal gram dal) washed and soaked for  1/2hr

2-3  small brinals

2 medium sized potatoes

½  dudhi or ghiya or bottle gourd.

2-3 tomatoes

One small piece of yam or sooran

2-3 green chillies

1 small piece of ginger
1/4tsp turmeric powder

1/4tsp coriander powder

1/4tsp dry mango powder

1/4tsp red chilli powder

1tbsp oil

Salt to taste

A pinch of hing
Water as required

Coriander leaves to garnish.


Method:

Cut all vegetables in small cube sized pieces.   Take a heavy bottomed pan and put oil. Once it heats add green chillies cut in small pieces and add hing. Stir for a min then add all vegetables and soaked dal.  Stir it and add atleast 1 cup of water.  Add salt and stir it. Cover and cook for 15 mins or if you are using pressure cooker then cook till 2 whistles come as dal has to become soft.  Open pan and check if dal is cooked.  Using a mashing spoon roughly mash the entire mixture.  Do not make pulp out of it. Just mash the vegetables and dal roughly.  Add all the spices and cook for 2-3 minutes. Adjust water if the gravy is too dry. If its more watery cook bit more. Add chopped ginger here for added flavor.   Finally its done.  Garnish with coriander leaves  and serve it hot with rice, poori or chapatti.

Enjoy and do let me know what you think.


http://chattersmusings.blogspot.com/


http://chattersmusings.blogspot.com/


Friday, July 06, 2012

Healthy Green Roti with spinach


Hello everyone! How have you all been? My today’s recipe Is again a simple yet delicious and healthy roti. Everyone knows the benefits of  greens in our diet, so I won’t start the lecture on it again and I think time for  everyone to be popeye the sailor man again. Ha ha ha… 

Lets begin our spinach roti.


Ingredients: 

1cup chopped greens(  I have used spinach leaves, methi leaves, dill leaves and along with it one more green called khatta)

2green chillies

¼ inch ginger

¼ tsp each of coriander powder, amchur(drymango) powder, red chilli powder, turmeric powder

Salt to taste
Some coriander leaves
2tbsp ghee
Water as needed

Wheat flour for rotis

Method:


Chop all the greens and keep in one cup, chop ginger and green chillies into small pieces. In a bowl, put wheat flour and all greens. Mix it nicely without water, add  salt and other dry masalas including chillies, ginger and green chillies, add ghee also, mix properly and add water slowly to make a nice tight dough. 


http://chattersmusings.blogspot.com/

Make atta like this.

Heat tawa.  Make balls from wheat flour a size bigger than lemons, roll it and cook it on tawa on both sides till its done, if needed  brush a little oil or ghee for it to cook properly,  keep the flame on medium heat.

Take out on plate and serve it hot with chutneys, tomato sauce or even dahi, you can have it as it is also.

In my home I make this for breakfast but at times when I am not in mood for elaborate dinner I make this as light dinner.  I have used ghee and oil a lot. You can skip the part of extra ghee or oil when you cook.

Hope you like this green, green roti with all leafy vegetables. Let me know what you think.


http://chattersmusings.blogspot.com/
  Green palak roti is ready to be eaten.


Monday, July 02, 2012

Lotus stem with potato/kamal kakdi...


Hello all! Today I am going to show you one dish made from lotus stem. It is also called kamal kakdi in hindi and bhey in Sindhi language.  Its made in gravy style as well as dry dish. I have made it dry and included potato in it.  So lets start.

Ingredients:
4-5 big thick  lotus stems or kamal kakdi
2 boiled potatoes
1/4tsp turmeric powder
1/4tsp amchur or dry mango powder
1/4tsp  red chilli powder
1/4tsp  coriander/cumin powder
Salt to taste
1tbsp oil
2green chillies cut in slits
Coriander leaves to garnish

Method:
Wash the dirt of the lotus stems/kamal kakdi nicely so all the dirt comes out. Scrape out the outer skin and  finally boil the kamal kakdi.  Once boiled remove from heat, let it cool and cut them in bit thick circles.  Dice the potatoes as well.  In a pan heat oil, add green chillies, stir it for a min and add kamal kakdi and potatoes. Stir it nicely then add all the above spices except coriander leaves,  stir it so all masalas are coated to  potato and lotus stem,  take it off heat and garnish with coriander leaves. Serve  with chapatti or rotis.

The taste of lotus stem is different but I can assure you its very much tasty dish and it has bit of crunchy taste. Try it and I am sure you would love it.  Over to you for feedback.


http://chattersmusings.blogspot.com/


http://chattersmusings.blogspot.com/


Optional: I have made it without onion,garlic or tomato.You can add extra flavours early into cooking too.

Friday, June 29, 2012

Dahi vadas/dahi bhalles


Hello again! How have you all been?  Today I am going to share with you my favourite snack item or chaat item. Dahi wadas or as some people call dahi bhalles. So did you all say….. Yummy.!  Won’t make you wait any more and show you how I make them and I absolutely love them. 


Ingredients:
1cup urad dal
1tbsp moong dal
Salt to taste
Yoghurt/dahi according to the need atleast 2cups 
Red chilli powder.
Jeera/cumin powder
Coriander leaves to garnish
Oil to deep fry the vadas

Method:

Soak urad dal along with moong dal  for atleast  4-6hours. Drain it nicely and then pulse it using mixer. Make into smooth paste. I am sure most of us know how much thin or thick paste it has to be.
Add salt to the mixture. Take a spoonful of batter and deep fry the balls till golden in color.  Once fried remove on plate then dip them in water for some time till they become soft.  Squeeze out the water and keep vada aside.
In a large pot or vessel, blend dahi with minimum water and add salt and a pinch of sugar.
Arrange vadas in plate and pour the blended dahi on top. Sprinkle red chilli powder and jeera powder and garnish with coriander leaves.  Let it chill and then serve.
Some people  use dates chutney and coriander chutney with it but I have just used the spices as I mentioned above.
Enjoy dahi vadas and let me know what you think.

Tip:  Soak dahi vadas in dahi  after squeezing out water and keep in fridge and as dahi  is being soaked by vadas, keep additional dahi ready, then serve as mentioned above.
If you put roasted jeera powder, it tastes even better.


http://chattersmusings.blogspot.com/


http://chattersmusings.blogspot.com/

Monday, June 25, 2012

Aam ras with puri/mango puree


Hello everyone! How have you all been? Well, the mango season is about to end. So I thought why not make aamras to ease my tummy and be at ease with this heat which is still here. Today I would  show you easy way to make aamras or in short mango puree which you can eat it as it is or with poori or as a topping on any dish. 

Its very easy and simple to make but taste wise yummy.

Ingredients for aamras:

2 Alphonso mangoes
Sugar if needed
Milk if needed


Method:
Peel the mangoes and take the pulp out. Make a smooth puree using mixer or handblender.  I used blender here.  Add sugar if you want more sweet and if the  puree is thick add slight milk.  Its done and your mango puree or aamras is ready.  Keep it in fridge to be chilled and serve it later with pooris. Pooris are standard and I am sure all know how to make it

Yummy yummy isn’t it?

So what are you waiting for! Have nice sweet aamras with poori.  


http://chattersmusings.blogspot.com/


Thursday, June 21, 2012

Grilled paneer bhurji sandwich.


Hi everyone!  My today's recipe is very simple but I just twisted it a bit. Everyone loves sandwiches, right? We all think of making new fillings and grill, bake and toast. This time I thought let me try something of mix and match. I made paneer bhurji after a long time though and it tasted yummy. Normally I make sandwiches with usual vegetables and at times I do grill it but this time I stuffed it with paneer bhurji. I am sure all of you have your way of making paneer bhurji and here I twisted it a bit. So before you jump on to the computer screen, let's begin making sandwiches.

Ingredients:

1/4kg paneer
1 tomato
1 onion 
1/4 inch ginger
1 capsicum
1 green chilli
1/4tsp cumin seeds/jeera
1/4tsp turmeric powder/haldi
1/4tsp  coriander powder
1/4tsp garam masala
1/4 tsp Dry mango powder/amchur powder
salt to taste
1tbsp oil
coriander leaves to garnish

Bread slices and butter for sandwich

Method:
Chop onions, tomato, capsicum, and ginger in small pieces and keep aside.In a pan, heat oil. Add onions and stir it till it becomes translucent. Add jeera, ginger and green chilli. Stir it and add capsicum. After a minute, add tomatoes. Stir it for two minutes only. Add all the dry masalas and mix the whole thing. Finally add crumbled paneer and mix well. Add coriander leaves and leave it aside in a plate.

Butter the bread on one side and spread paneer mixture on it. Cover the slice with another buttered side of bread.
Grill the sandwich and serve it hot with chutney or sauce.
The taste was great and my family really loved this. Try it and let me know what you think.

http://chattersmusings.blogspot.com/
                                                                   Paneer Bhurji


http://chattersmusings.blogspot.com/

http://chattersmusings.blogspot.com/
                                                                Grilled sandwich

http://chattersmusings.blogspot.com/
                                                                  Paneer Bhurji filling


Sending this to Divya's event  'The Master Chef Contest' 


Sunday, June 17, 2012

Masoor dal tikki/cutlets


Hello everyone! Hope you all are having great time. My today’s recipe is result of another  brainstorming innovations.  As the title suggests it has to do with masoor dal, so what did I do with it? I had some boiled but not mashed masoor dal left over as it was too much to cook and make dal. I kept thinking I should try something new with it rather than plain dal fry.  As I racked my brains I recalled I had seen something like this on tv and now its time for me to try. I was not sure what the end result would be so first I took very little dal and tried to make this and result and taste was very good. I got bold and finally made it with bit of variations.
So lets begin our masoor dal kabab/tikki/cutlet.

Ingredients:
1 cup boiled masoor dal ( for me it was left over)
¼ cup sooji /rawa
1/4cup  rice flour         
1 onion chopped fine
Salt to taste
1/4tsp amchur powder/dry mango powder
1/4tsp dhaniya powder/coriander powder
¼ tsp cumin seeds
2green chillies cut in small pieces
1/4tsp red chilli powder
A pinch of garam masala powder
Coriander leaves cut
Cheese cut in cubes

Method:
Combine all the ingredients above except cheese  and as the dal is moist the flour would absorb all the moisture.  Since I had left over dal so I had kept in fridge and kept other ingredients ready before only that way less moisture was there. Grease your palm and make a tikki with your hands with dal mixture.  Put in each mixture one small cube of cheese and close it properly.  Deep fry in oil till its cooked on both sides. Take them off the heat and put on paper to soak excess oil.

Serve hot with tomato sauce or any chutney and perfect snack for rainy season.

You can cut out spices according to your needs if u feel its too hot.   I had made this first time and  I was given nice thumbs up for it.  Alternatively you can bake this in oven or shallow fry  them. 
So what do you think of this. 


http://chattersmusings.blogspot.com/


http://chattersmusings.blogspot.com/

http://chattersmusings.blogspot.com/

http://chattersmusings.blogspot.com/


Disclaimer:  The measurements in all the recipes given here are for representation  purpose only and all are advised to use it according to their need.


Linking this to Minnie's post WEEKEND DINNER EXTRAVAGANZA

Related Posts Plugin for WordPress, Blogger...

Recent Posts

Share

Twitter Delicious Facebook Digg Stumbleupon Favorites